Showing posts with label recipes. Show all posts

Monday, February 13, 2012

Apples to Apples

I bake for people. It's what I do. It's how I show my friends that I care about them. It's how I celebrate big events. It is, quite literally, what I bring to the table. So when I encounter people that claim to not like sugar or not eat sweets, I have only one reaction.


One of my coworkers has resisted by baking since the day I started working at our school. He claims to prefer croissants to cookies. Pfft! For Christmas, I threw some of my family's famous Blackbottom Cupcakes, along with some cookies and truffles, and I finally got him to crack. He sent me a picture of an empty plate, with only a few sprinkles of crumbs and a whole bunch of cupcake liners. Success! So now that this is his final week at our school, I knew I had to find out exactly what he wanted for his farewell treat. His favorite dessert? Cold Apple Pie. Now I don't make large desserts - I make small, bite-sized, hand 'em out to everyone you know desserts. After running a few ideas by him, I picked two recipes: Apple Pie Cupcakes from Inspired Taste and Apple Pie Cookies from smitten kitchen.

The cupcakes were pretty straightforward, but the cookies were a labor of love. Back-breaking, sweat-inducing, arm-strengthening love. But more on that over on my personal blog.

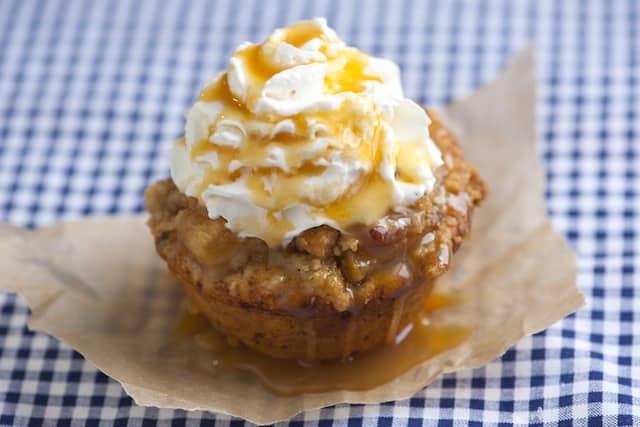
First, the cupcakes.


Source


Apple Pie Cupcakes
tripled & ever-so-slightly adapted from Inspired Taste

Ingredients

  • 12 tablespoons unsalted butter
  • 6 large Granny Smith apples, peeled, cored and diced in to 1/4-inch cubes
  • 1 1/2 teaspoon ground cinnamon
  • 3/8 teaspoon salt
  • 4 1/2 Tbsp lemon juice (or the juice of 1 1/2 lemons)
  • 3/4 cup all purpose flour
  • 3/4 cup + 6 tablespoons packed brown sugar
  • 3 cans (12.4 oz) Pillsbury refrigerated cinnamon rolls
  • whipped cream
  • cooking spray


Directions
Heat oven to 400°F. Lightly spray 24 regular-size muffin cups with cooking spray.

In a skillet, melt 3 tablespoons butter over medium-high heat. Add half of the apples; cook about 5 minutes, stirring occasionally, until softened. Sprinkle with 3 tablespoons brown sugar, half the cinnamon and salt. Cook 5 minutes longer or until tender. Stir in lemon juice. Repeat with the second half of the apples. Note: if you have a larger skillet, you can probably do all of the apples at once. I only have a 10-inch one, so I had to do mine in 2 batches.

Meanwhile, in small bowl, mix remaining butter, flour, 3/4 cup of brown sugar with fork or hands until crumbly. Set aside.

Separate dough into 24 rolls. Flatten each into 4-inch round; place in muffin cup. Divide apple filling evenly onto rolls in muffin cups. Divide flour mixture evenly over apples.


Bake 10 to 12 minutes or until bubbly and tops are lightly browned. Cool slightly before removing from muffin cups. Cool completely, about 30 minutes. Serve cupcakes topped with whipped cream.


The cupcakes came out super sweet and SO delicious! Two of my roommates came home while they were cooling and commented that the whole floor hallway smelled like cinnamon. You're welcome, good people of the second floor.

Apple Pie Cookies
faithfully followed from Smitten Kitchen

Ingredients
Crust
  • 2 1/2 cups all-purpose flour, plus more for dusting surfaces
  • 2 tablespoons granulated sugar
  • 1 teaspoon table salt
  • 2 sticks unsalted butter, very cold
  • 1/2 cup water, very cold (I put it in the freezer for a few minutes until I was ready for it)
Filling
  • 3 medium apples, whatever you like to bake with
  • Squeeze of lemon juice (optional)
  • 1/3 cup granulated sugar
  • 1 teaspoon ground cinnamon
  • Few gratings fresh nutmeg
  • A pinch of any other spices you like in your apple pie (I added some ginger)

To finish
  • 1 large egg
  • Coarse or granulated sugar for garnish

Additional stuff
  • 2 baking sheets covered in parchment paper
  • A dough blender. I suggest investing in one that's comfortable in your hands (OXO Good Grips FTW). You can also use two forks, but it's much, much harder.
  • A rolling pin. Or, alternatively, an empty wine bottle. Drink remaining wine if needed. Take one for the team.
  • A pastry brush. Or, alternatively, your fingers.
  • A fork and sharp knife for crimping and making slits
  • Two round cookie or biscuit cutters of different sizes. SK recommends 2 1/2-inch and 1 1/2-inch rounds. Mine were a little closer in size, and I wished they weren't.


Directions
First, the pie dough:
Whisk together flour, sugar and salt in the bottom of a large, wide bowl. Cut your butter into smaller pieces - tablespoons or so ought to do. Using a dough blender, work the butter into the flour until the biggest pieces of butter are the size of small peas. Gently stir in the ice water with a rubber spatula, mixing it until "a craggy mass forms". I wasn't really sure what that meant until I saw it. Use your hands to knead it just two or three times to form a ball. Divide dough in half. Wrap each half in plastic wrap and flatten a bit, like a disc. Chill in fridge for at least an hour or up to two days. I chilled mine for about an hour and a half.

Next, get your life together and line up six small dishes:
1. Water
2. Leave it empty right now
3. Mix sugar, cinnamon, nutmeg, and other spices
4. A little flour to dust the surface
5. Whisk an egg with one teaspoon of water until smooth
6. A little sugar for decorating the tops of the pies

Then, roll out:
On a well-floured counter, roll out your pie dough pretty thin, a little shy of 1/8-inch thick. I'm bad at this, so mine wasn't as thin, which is probbbbably why my recipe made fewer cookies than it was supposed to. GO THINNER. Just tell yourself that. Lift and rotate your dough as you roll it, to ensure that it rolls out evenly and so you can be sure it’s not sticking in any place. Use the larger of your two cookie cutters to cut as many rounds as you can from the dough. Transfer them to parchment-lined baking sheets and keep them in the fridge until you need them. Once you’ve finished the first packet, repeat the process with the second packet of dough

Prepare your apples:
Peel your apples. Cut thin (1/8-inch thick, again, mine were probably thicker) slices from one side of whole apple, stopping when you hit the core. Repeat on opposite side. I wish I could tell you how many slices I got, but I honestly forgot to count. Use the smaller of your two cookie cutters (mine was about 1 2/3 inches) to cut the apples into cute little discs that will fit inside your pie cookies. Place them in your second bowl, covering them with a few drops of lemon juice if you find that they’re browning quickly (mine were okay without lemon juice).

Preheat oven to 350 degrees.

Apple cookies, ASSEMBLE!
Grab your first disc of chilled dough and lightly dampen it on one side with the water to help it seal. Take your first disc of apple and toss it in the cinnamon spice sugar. Place it on the damp side of the bottom disk. Place a second disc of dough on top; I found it easiest to seal it by picking the whole thing up (this is when you’ll be glad that your dough is cold and semi-firm; if it’s soft and getting sticky, chill it until it’s easy to pick up) and press the tops and bottoms around the apple with your fingers. Back on the floured counter, cut decorative slits in your “pies”. Dip your fork in the flour and use it to create a decorative crimp on the sealed edges. Brush your cookie with egg wash and sprinkle with coarse sugar. Replace on baking sheet and chill while you prepare the others.

It sounds insane, but if you follow SK's recipe faithfully, you WILL get cookies. And they WILL be delicious.

Bake your apple pie cookies for 25 minutes, or until puffed and bronzed and very pie-like. Mine were done in about 22-23 minutes. Transfer to a cooling rack to cool before eating them… or, if you're like me and SK, eat them immediately and try not to burn your mouth too badly.


The cookies are not too sweet, and the crust-to-apple ratio is pretty big. I mean, it's mostly crust. It's almost entirely crust. I think the two desserts balance each other out nicely. But what did my coworkers think? Stay tuned for an update!


What's your favorite way to update a classic recipe?

Monday, June 27, 2011

Put the Lime in the Coconut

A few weeks ago, I bought sour cream to make Homemade Hostess Cupcakes. I had some left over because, as you may remember, I did not make as many Disaster Cakes as previously planned. I awoke this morning to find the biological clock on my sour cream rapidly ticking. I had already decided to make My Baking Addiction's Lime Coconut Sour Cream Bundt Cake - in fact, I had purchased a bundt pan (and new cooling racks!) for just this occasion thanks to a fabulous BB&B coupon.

This was my first coffee cake, and my first time making anything in a bundt pan, so I was a little nervous. I forgot to take pictures throughout the baking process, but I am proud to announce that the end result was delicious! I learned a few things from this experience: First, zesting limes takes longer than you think it will, so you should probably do it first so you're not waiting around for them. Second, there is a clear, marked difference between the standard store brand pan and a Calphalon pan. I decided to spend the extra dollars to get the Calphalon bundt pan and it was worth it. The nonstick coating is really wonderful; the burnt-on, caked-on scrapings from my spatula around the top of the pan came off with practically no effort. Anyway, just buy the nicer pan. It's worth it.

My only alterations to the recipe were that I used regular, non-organic, full-dairy sour cream (because that's what I had on hand) and I was short on limes, so I used the zest of about 2 1/4 limes for the cake and the zest of about 3/4 limes for the glaze & went a little short on the powdered sugar to balance out the flavor. For an extra punch of lime, I squeezed the juice of about half a lime into the cake batter. I think it was a nice touch.

Lime Coconut Sour Cream Bundt Cake
Ingredients

  • 1 cup (2 sticks) unsalted butter, softened
  • 1 1/2 cups granulated sugar
  • Zest of 3 medium limes
  • 2 teaspoons of vanilla
  • 2 eggs
  • 2 cups all-purpose flour
  • 1 teaspoon baking powder
  • 1 teaspoon baking soda
  • 1 cup sour cream
  • 1/2 cup sweetened, flaked coconut
Directions

Preheat your oven to 350 degrees. Grease a 10-inch bundt pan. Like I said before, with the nonstick pan, this is much less of a scary step - I just used the papers from the butter and an extra spritz of Canola Oil spray. I didn't flour it because, well, because I tried it and it looked like it wasn't going to work.

With a hand mixer in a large bowl, cream the butter until smooth. If you are blessed enough to own a KitchenAid Stand Mixer, use the paddle attachment.

In a medium bowl, combine the sugar and lime zest, mixing together with your fingertips until the sugar is moistened and fragrant. Add the sugar mixture gradually into the butter and beat until light and fluffy. Mix in vanilla. This is also when I added in the extra lime juice.

Add eggs, one at a time, beating well after each addition.

In a medium bowl, combine flour, baking powder, and baking soda. Add flour mixture, alternating with sour cream, into the butter mixture, beating well after each addition. Fold in coconut.

Spoon mixture into prepared pan and smooth the top with a spatula or knife.

Bake for 50 to 60 minutes or until a toothpick inserted in the center comes out clean (my oven is super hot so I baked mine for about 45).

Cool for 20 minutes on a wire rack. Invert cake onto wire rack; gently remove pan (again, the nonstick is wonderful here). Cool completely.


Meanwhile...

Lime Glaze
Ingredients
  • 1 cup confectioner's sugar
  • 5 tablespoons heavy cream
  • 1/2 teaspoon vanilla extract
  • zest of 1 medium lime
Directions

In a medium bowl, combine all ingredients and stir until smooth. If mixture is too thick, add more cream one tablespoon at a time. I think I added an extra tablespoon and a half.


Spoon over cooled cake.


Coffee cake success! It's moist and fluffy with just the right amount of crumb. I recommend eating it with a fork. I especially love the mixture of summery, tropical flavors - it's a cake that manages to be light and refreshing!


Are you playing with any fun flavors this summer?

Tuesday, June 14, 2011

Six-And-A-Half Layer Squares

Baked goods are the perfect gift. They are cheaper than real presents, more personal than a store-bought birthday cake, and you can guarantee the birthday boy or girl is going to love your gift. One of my closest friends and frequent nompanions celebrated her birthday this weekend, and I was at a loss for the perfect recipe. She loves chocolate, but I've also seen her eat fruity things (mostly banana or lime flavored goodies). She also had some specific requests about peanut butter - it wasn't her favorite, but she didn't mind it. I had already made cupcakes, so those were off the table. I reached out to my friends & followers and decided to make Seven Layer Bars, aka Magic Bars.

I picked a recipe from the amazing Brown Eyed Baker because I could count the seven layers - and that was VERY important to me. I then decided to swap out butterscotch chips for peanut butter chips (I like peanut butter MUCH better), but to only put them on half of the pan, since the birthday girl is not a huge PB fan. Hence, six-and-a-half layer bars... that later became squares due to the smallness of the pan I had available. Either way, they were magic.

Ingredients/Layers:
  1. Graham cracker crust (9 full graham crackers + 1 stick of melted butter)
  2. Chopped walnuts (1 cup)
  3. Semisweet chocolate chips (1 cup)
  4. White chocolate chips (1/2 cup)
  5. Peanut butter chips (1/2 cup - I reduced to 1/4 cup since I only used them on half the pan)
  6. Sweetened coconut (1 cup)
  7. Sweetened condensed milk (1 14 ounce can)


Directions

Preheat oven to 350 degrees. Spray a pan (I used 8x8, original recipe recommends 9x13) with nonstick cooking spray. Line with aluminum foil, and spray again. Be sure to leave the foil hanging over the edges to act as handles to lift out the bars.


Spread the coconut on a baking sheet and bake until the outer flakes begin to brown, about 4 minutes. Watch it! Coconut can go from delightfully toasty to burnt in a matter of seconds. Set aside.

Meanwhile, crush those graham crackers. Break them into manageable pieces and place in a gallon-sized freezer bag. Enlist the help of a friend or roommate so you can do other things while this is happening. Sweetened condensed milk makes a wonderful rolling pin.


And when that doesn't work, a bottle of tequila is a useful tool as well.


Melt the butter in a small bowl, then pour in the graham cracker crumbs. I used a spatula to get it going, then tossed with my fingers until totally combined.  Press the crumbs evenly into the bottom of the prepared pan.

In order, sprinkle the walnuts, chocolate chips, white chocolate chips, peanut butter chips, and coconut  over the graham crumbs. Take a moment to admire all the goodness.


Pour the sweetened condensed milk evenly over the entire dish.


Bake until the top is golden brown, about 25 minutes. This is where I ran into trouble with the 8x8 pan. I left it in for a couple more minutes, then turned it down and gave it a few more minutes so the outside wouldn't burn but the inside would still set. Use your eyes and nose, and you'll know when they're done.

Cool in the pan on top of your useless radiator on a wire rack to room temperature, about 2 hours.

Remove the bars from the pan using the foil handles and transfer to a cutting board. Using a sharp knife, cut into 2x3 inch bars or 16 squares, depending on the size of your pan.


These bars were truly magic - super easy to make, totally delicious, and a huge hit! Bonus perk: I now have a ton of leftover ingredients to inspire the next round of baked goods!


Have you ever given homemade goodies as a gift?

Friday, June 10, 2011

Disaster Cakes

It appears as though I am in a bit of a baking funk. Great timing, considering I just got this blog and all. I am determined to get out of this funk, but in the meantime, I'd like to tell you all about Disaster Cakes.

A few weeks ago, we went out for one of my roommate's birthdays at Dinosaur BBQ in Harlem. As we were wrapping up dinner, we decided we needed to walk up to Fairway to digest a little before walking home and sitting on our butts like the fat loads we felt like (post-Dino fatness is the best of all fatnesses). Since we were going to the supermarket, my roomies asked what cupcakes would I be buying ingredients for. Homemade Hostess Cupcakes, I declared. I knew I had a recipe in my Martha Stewart Cupcakes book, and I was ready to try it.

(Source: Martha Stewart)

Everyone got instantly excited. I pulled the recipe up on my phone and quickly saw that it only made 12 cupcakes. I would double it! But wow, that seemed like a lot of butter and Marshmallow Fluff for 24 cupcakes. That's because the recipe made 12 jumbo cupcakes, which translates to 24 regular cupcakes. I now had the ingredients to make 48 Homemade Hostess Cupcakes. I have a class of 18 and a friend's birthday coming up... no problem! I soon realized I wanted nothing to do with more than 24 of these cupcakes.

Many things went wrong yesterday. First of all, let's talk about the definition of "room temperature." The Internet defines room temperature as between 65 and 75 degrees Fahrenheit (roughly). When it is 95 degrees outside and you are in an unairconditioned and poorly ventilated room, your room's temperature is going to be a little warmer. Add a 350 degree oven and a cook running around like a chicken with her head cut off to that, and you're basically cooking outside in the New York City summer. My tiny hurricane fan couldn't keep up! I blame the temperature for the majority of things that happened with these cupcakes.

The rest of the things that went wrong were totally my fault. I thought I knew more than Martha. Cooking Rule #346: You NEVER know more than Martha! There was a reason these cupcakes were supposed to be jumbo. There was a reason these cupcakes were unlined and the pans greased a certain way. And there was a reason she outlined a ridiculously detailed method of filling these cupcakes. I'm sorry I doubted you, Martha. My laziness will be my demise.

Let's get right to it. For the complete, accurate, uninterrupted recipe, check out Martha's website.

Jumbo Cream-Filled Chocolate Cupcakes (from Martha Stewart's Cupcakes)

Ingredients
  • 1 cup (2 sticks) unsalted butter, room temperature, plus more for tins
  • 3/4 cup unsweetened cocoa powder, plus more for tins
  • 2 cups all-purpose flour
  • 1/2 teaspoon baking soda
  • 2 teaspoons baking powder
  • 1/2 teaspoon salt
  • 2 cups sugar
  • 3 large eggs, room temperature
  • 1 cup sour cream, room temperature
Directions

Preheat oven to 350 degrees. Brush tins with butter; dust with cocoa powder, tapping out excess.
Here's where I thought I knew more than Martha. Brushing the tins and dusting with cocoa took forever, dyed my finger brown, and honestly didn't look to be creating a really great protective coating. For my second muffin tin, I sprayed liberally with nonstick cooking spray. It would be an experiment. Which would work better?


Whisk together flour, cocoa, baking soda, baking powder, and salt. Set aside.

With an electric mixer, cream butter and sugar until pale and fluffy. Add eggs one at a time, beating until each is incorporated, scraping down sides of bowl as needed.
With the exception of creaming butter & sugar together, I mix all of my cakes by hand. Always.

Add flour mixture in two batches, alternating with the sour cream, and mixing until just incorporated after each.
My batter was super lumpy, so I broke my own rule and gave it a little spin with my hand mixer.

Divide batter evenly among prepared cups, filling each with about 1/4 cup (1/2 cup if you're making jumbo cakes).


Bake, rotating tins halfway through, until a cake tester inserted in centers comes out clean, about 20 minutes. Cool in tins 5 minutes, then run a small knife around the edges to loosen; turn out cupcakes onto racks and let cool completely.
Remember when I said I don't have cooling racks or a cupcake carrier? Well, I bought a carrier, but not racks... so I used my carrier as a cooling rack! It worked a lot better and took up a lot less space than the plates I had been using.

I bet you're dying to know the results of the experiment. Just kidding, you totally already know. Martha was right, and I was wrong.


The actual cakes weren't a total disaster. It was the Marshmallow Cream Filling that did me in.

Ingredients
  • 1 1/2 cups marshmallow cream, such as Marshmallow Fluff
  • 1/2 cup (1 stick) unsalted butter, cut into pieces, room temperature


Directions


Whisk marshmallow cream and butter until smooth. Cover with plastic wrap and chill until slightly firm, 15 to 30 minutes, before using.

I should have chilled for longer. I should have stopped filling halfway through and re-chilled. It was too damn hot in my kitchen, and the runny Fluff filling got everywhere. Fluff on the table. Fluff on the floor. Fluff clogging my drain. Fluff on my brand new apron. Somehow, someway, Fluff on my cabinets?


I did not follow Martha's filling directions at all. At this point, I was frustrated and my kitchen was a disaster. It was hot, and I was tired. I put my Fluff in a piping bag with a filling tip, poked a hole in the top of the cake, and filled until it oozed out. The cakes were already ugly - they were all short, some were burnt, and half were missing chunks out of the bottom. I no longer cared. I had accepted Disaster Cakes for what they are - a delicious mess.


I brought them to class that night, and they were a big hit. I apologized a million times, but no one seemed to care that they were hideous. One of my classmates, a far more experienced baker than I, talked me though my disaster and advised me to chalk it up to the temperature and move on. I will not be making these again - at least not without jumbo tins and the proper filling technique. Instead, I'm going to find something else to do with the leftover Fluff and sour cream, although I'm not quite sure what that is...

So what have we learned?
  1. Don't bake at noon in the summer in your unairconditioned dorm.
  2. Marshmallow Fluff was created by the devil to destroy your kitchen.
  3. Nobody cares how things look as long as they taste good.
  4. I do not know more about cupcakes than Martha Stewart.

What was your biggest baking disaster?